

Intro.
AJAX is commonly used to create features like auto-complete search boxes, real-time updates, and interactive forms on websites. It enhances the user experience by reducing page reloads and making web applications feel more responsive. While the term "XML" is in the name, modern web development often uses JSON or other data formats instead of XML due to their simplicity and compatibility with JavaScript.
Asset caching done by Flask.
Problem :
The problem of asset caching in Flask refers to how web browsers and intermediate caching servers store and reuse static assets (such as CSS files) to improve page load performance. When a browser requests a static asset, it may cache the asset locally. While this caching can significantly reduce load times, it can also lead to issues when you update your assets because the browser might still use the cached version.
Solution:
To solve this issue, you can use a technique called "cache busting," which involves adding a unique query string to the URL of the asset. This query string is typically a version or cache identifier, ensuring that the browser requests the latest version of the asset whenever it changes. Here's how it works in your Flask application:
Example:
Generate a unique cache_id using UUID
unique_id = str(uuid.uuid4())
this value is passed to the HTML template when rendering. In the HTML template, the
unique_idis added as a query string to the URL of the CSS file, ensuring that the browser will fetch the latest version of the CSS file whenever theunique_idchanges.return render_template('index.html', unique_id=unique_id )<!-- Link to CSS file with cache-busting query string -->
<link rel="stylesheet" type="text/css" href="/static/styles/main.css?{{ unique_id }}">
Ready function :
In jQuery, the $(document).ready() function is often used to ensure that your code runs only after the Document Object Model (DOM) has been fully loaded and is ready to be manipulated. This is a common practice to prevent issues where JavaScript code is executed before the DOM is fully constructed, which can lead to unexpected behavior.
Here's how you can use the $(document).ready() function in jQuery:
$(document).ready(function() {


});
Inside the function provided to $(document).ready(), you can write your JavaScript/jQuery code to interact with the DOM, set up event listeners, or perform other tasks that require the DOM to be fully loaded.
Here's an example of how you might use it to ensure your JavaScript/jQuery code runs after the DOM is ready:
$(document).ready(function()
{ // This code will run after the DOM is fully loaded // You can safely interact with DOM elements here //
For example, you can add event listeners to elements. $('#myButton').click(function() { alert('Button clicked!');
 });
});
The
$(document).ready()function is especially important when you include your JavaScript code in the<head>section of your HTML, as it ensures that your code doesn't execute until the entire DOM is ready.
Checkbox's state in jQuery:
To capture a checkbox's state in jQuery and determine if it is checked, you can use the `prop()` or `is()` method. Here's how you can do it:
1. Using the `prop()` method:
```javascript
// Assuming you have an HTML checkbox with an id of 'myCheckbox'
if ($('#myCheckbox').prop('checked')) {
// The checkbox is checked
console.log('Checkbox is checked');
} else {
// The checkbox is not checked
console.log('Checkbox is not checked');
}
```
2. Using the `is()` method:
```javascript
// Assuming you have an HTML checkbox with an id of 'myCheckbox'
if ($('#myCheckbox').is(':checked')) {
// The checkbox is checked
console.log('Checkbox is checked');
} else {
// The checkbox is not checked
console.log('Checkbox is not checked');
}
```
In both of these examples, we use jQuery to select the checkbox element with the id 'myCheckbox' and then check its state. If the checkbox is checked, it will execute the code within the first `if` block, and if it's not checked, it will execute the code within the `else` block.
Working with data attributes:
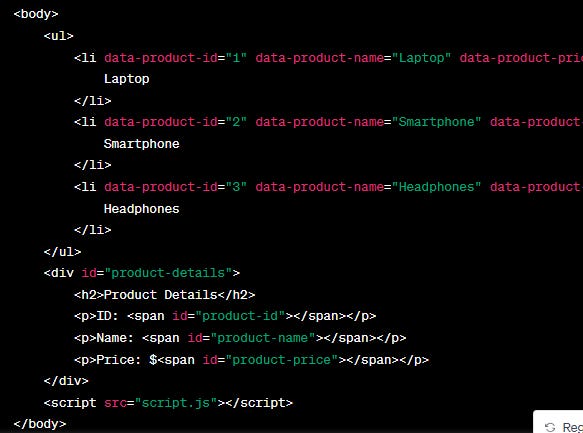
Let's say you have a list of products, and each product has some associated data such as an ID, name, and price. You want to create a feature that displays product details when a user clicks on a product. You can use data attributes to store this information and capture it when a product is clicked.
HTML:
JavaScript (script.js) using jQuery:
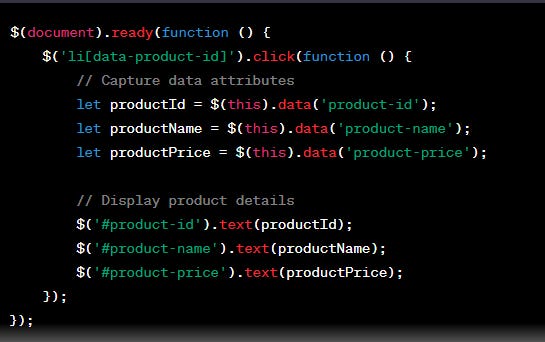
In this jQuery-based code:
We use
$(document).ready()to ensure that the code runs when the document is fully loaded.We attach a click event handler to all
<li>elements with thedata-product-idattribute.When a product item is clicked, we use
$(this).data('data-attribute')to capture the values of the data attributes. For example,$(this).data('product-id')retrieves the product's ID.We update the content of the product details
<div>with the captured data using jQuery's.text()method.
Make an API request using jQuery:
To make an API request using jQuery, you can use the $.ajax() method or the shorthand $.get() and $.post() methods. Here's an example of how to use $.ajax() to request an API:
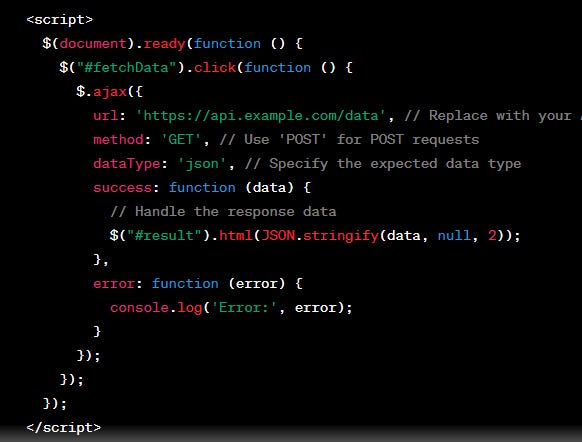
In this example:
Create a button with the
id="fetchData"to trigger the API request.In your JavaScript, use
$.ajax()to send an HTTP GET request to the API endpoint. You can change theurlandmethodas needed for your specific API.Handle the response in the
successcallback function. In this example, it simply displays the JSON response in adivwith theid="result".
Ajax Post request:
Example : capture the text entered by client
To capture the text entered in a search input field and send it in a POST AJAX request, you can follow these steps:
1. HTML: Create an input field for the search query and a button to trigger the AJAX request. Give them appropriate IDs or classes for easy selection in JavaScript.
```html
<input type="text" id="searchInput" placeholder="Enter your search query">
<button id="searchButton">Search</button>
```
2. JavaScript: Use jQuery to capture the input text and send it in a POST request when the button is clicked. Here's a sample code snippet:
$(document).ready(function () {
$('#searchButton').click(function () {
// Get the search query from the input field
var searchQuery = $('#searchInput').val();
Prepare the data for the POST request
Then make the ajax call:
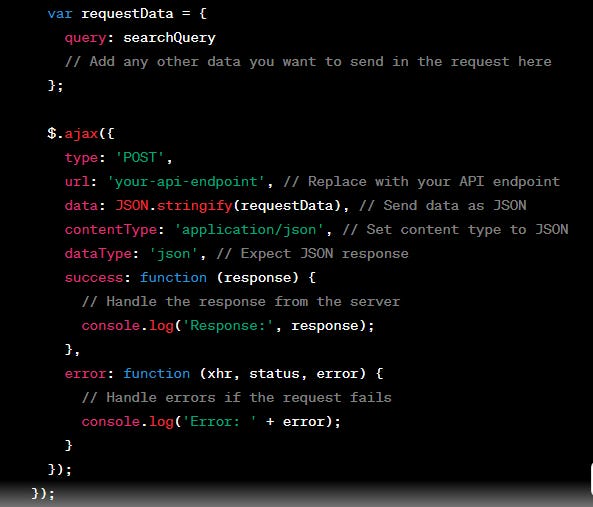
In this code:
- We capture the search query from the input field using `$('#searchInput').val()`.
- We prepare the data to send in the POST request as an object (`requestData`) and convert it to a JSON string using `JSON.stringify`.
- The AJAX request is set up to send a POST request to your API endpoint with the search query as data.
- You should replace `'your-api-endpoint'` with the actual URL of your API.
- The response from the server can be handled in the `success` callback.
Resources:
