
How to Upload Images to Cloudinary in Node.js Using Multer and ExpressJS
express - Js - upload images - cloudinary - multer - back end

The ability to handle media efficiently is crucial for creating engaging web applications. Whether you’re developing a social media platform, an e-commerce site, or a personal portfolio, images play a vital role in enhancing user experience and conveying visual information.
This tutorial is designed to equip you with the knowledge to implement a robust image handling and uploading feature using Cloudinary, a leading cloud-based service for managing media assets.
Before we start we need to know:
Multer is a middleware for handling multipart/form-data, primarily used for uploading files in Node.js applications. It parses the request and extracts the uploaded files, making them available in the request object for further processing.
Cloudinary, on the other hand, is a cloud-based image and video management platform that offers an end-to-end solution for storing, managing, manipulating, and delivering media assets. It provides advanced capabilities for manipulating.
Using Multer and Cloudinary together provides a powerful solution for handling file uploads in a Node.js application. This combination simplifies the process of uploading, managing, and processing images in web applications, making it easier to manage large volumes of images or implement advanced image processing techniques
Prerequisites
Node.js installed on your machine.
A Cloudinary account. Sign up for free if you don't have one.
Basic understanding of Express.js.
Step 1: Set Up Your Project
Initialize a new Node.js project if you haven't already:
mkdir node-cloudinary-upload
cd node-cloudinary-upload
npm init -y
Install necessary packages:
npm install express multer cloudinary dotenvStep 2: Configure Cloudinary
Create a .env file in your project root and add your Cloudinary credentials:
CLOUDINARY_CLOUD_NAME=your_cloud_name
CLOUDINARY_API_KEY=your_api_key
CLOUDINARY_API_SECRET=your_api_secret
Create cloudinaryConfig.js in a utils or config directory to configure Cloudinary:
// utils/cloudinaryConfig.js
const cloudinary = require('cloudinary').v2;
require('dotenv').config();

cloudinary.config({
  cloud_name: process.env.CLOUDINARY_CLOUD_NAME,
  api_key: process.env.CLOUDINARY_API_KEY,
  api_secret: process.env.CLOUDINARY_API_SECRET,
});

module.exports = { cloudinary };
Step 3: Implement Multer for File Handling
Create imageUploadMiddleware.js in a middlewares directory.
This file will handle image uploads to your server using Multer and then upload those images to Cloudinary.

Step 4: Upload Function to Cloudinary
Still in imageUploadMiddleware.js, implement the function to upload images to Cloudinary:

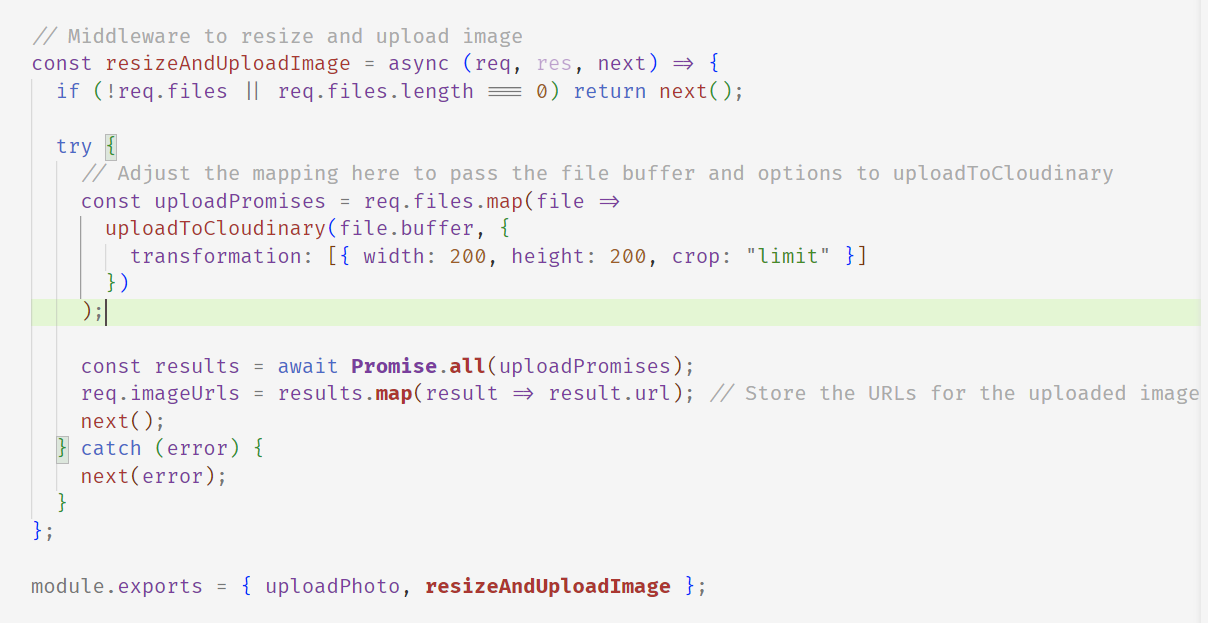
Step 5: Middleware to Resize and Upload Image
Implement the middleware that processes the file upload and uploads the image to Cloudinary:
Step 6: Set Up Express and Routes
Create an Express server in app.js and use the middleware to handle image upload routes:
// app.js
const express = require('express');
const { uploadPhoto, resizeAndUploadImage } = require('./middlewares/imageUploadMiddleware');
const app = express();
app.post('/upload', uploadPhoto.array('images', 5), resizeAndUploadImage, (req, res) => {
res.json({
message: "Images uploaded successfully",
urls: req.imageUrls,
});
});
const PORT = process.env.PORT || 3000;
app.listen(PORT, () => console.log(`Server running on port ${PORT}`));
Step 7: Testing the Upload
Use Postman or a similar tool to test the /upload endpoint. Select "form-data" in the body, set the key to images, and upload your files.

You can furtherly save images urls into your database like :

Resources:
[1] https://dev.to/titre123/uploading-and-managing-images-with-nodejs-multer-and-cloudinary-a-comprehensive-guide-520a
[2] https://medium.com/@tushar_chavan/middleware-magic-getting-image-urls-with-multer-and-cloudinary-in-node-js-5235f512171