Python - Object-relational mapping
0x0F. Python - Object-relational mapping - OOP - SQL - MySQL - ORM - SQLAlchemy
Databases and Python:
Databases: Databases are used to store, retrieve, and manage structured data efficiently.
Here's a brief overview of databases:
SQL (Structured Query Language): SQL is a domain-specific language used to manage relational databases. It allows you to create, read, update, and delete data (CRUD operations) in a structured manner.
“SQL is a domain-specific language because it is designed to interact with and manage data in relational databases. It is not a general-purpose language like Java or Python,”
MySQL: MySQL is one of the most popular open-source relational database management systems. It's widely used in web applications to store and retrieve data.
How to install MySQL 8.0 in Ubuntu 20.04?
$ sudo apt update
$ sudo apt install mysql-server
Check Version:
MySQLdb and SQLAlchemy
Two different Python libraries used for interacting with MySQL databases. Each has its own advantages and use cases,
MySQLdb:
Low-Level Interface: MySQLdb is a low-level library that provides a simple and direct interface to interact with MySQL databases. It allows you to write raw SQL queries and execute them directly. Since it's a low-level library, MySQLdb is known for its speed and efficiency. If you need to perform simple database operations quickly, it can be a good choice.
SQLAlchemy:
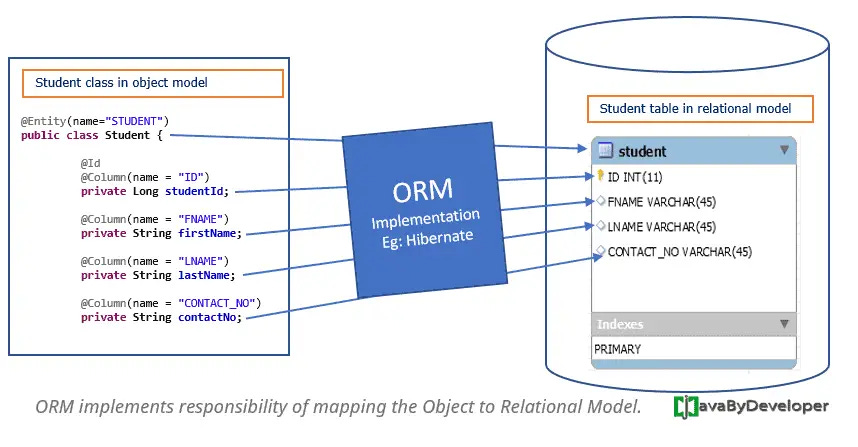
Object-Relational Mapping (ORM): SQLAlchemy is a high-level library that provides an ORM layer on top of MySQL. It allows you to interact with the database using Python objects and classes, abstracting away much of the SQL complexity, without writing raw SQL
Highly flexible and can be used with various database systems, not just MySQL. If you plan to switch to a different database system in the future, SQLAlchemy can ease the migration process.
Security: SQLAlchemy helps prevent SQL injection attacks by automatically escaping values in queries, making it a safer choice.
How to connect to a MySQL database from a Python script ?
1. **Open MySQL Command-Line Client**:
Create a database:
CREATE DATABASE mydb;**Verify Database Creation**:
You can verify that the database was created by listing all the databases:
SHOW DATABASES;
sudo apt updatesudo apt install pkg-config
sudo apt-get install libmysqlclient-dev
pip install mysqlclient
in python script :
Import the MySQLdb Library:
First, you need to import the
MySQLdblibrary in your Python script:Set Your Connection Parameters:
Replace
MY_HOST,MY_USER,MY_PASS, andMY_DBwith your actual MySQL database connection detailsEstablish the Database Connection:
You can use the
MySQLdb.connectmethod to create a database connection:'passwd' not 'password'.

connects to the MySQL database using the provided host, username, password, and database name. The resulting dbobject represents the database connection.4.Perform Database Operations:
Once you have established the database connection, you can create a cursor and execute SQL queries
a cursor is a database object that allows you to interact with and manipulate the results of a database query. It acts as a pointer or iterator that moves through the rows of a result set returned by a database query. Cursors are used to retrieve and process data row by row from the database.
cur = db.cursor()
How to map a Python Class to a MySQL table?
Mapping a Python class to a MySQL table is a common task when working with object-relational mapping (ORM) libraries. ORM libraries provide a way to represent database tables as Python classes and allow you to interact with the database using Python objects. One popular ORM library for Python is SQLAlchemy.
To create a Python Virtual Environment, allowing you to install specific dependencies for this python project, we will install venv:

sudo apt-get install python3.8-venv
python3 -m venv venv
source venv/bin/activate
Install MySQLdb module
For installing MySQLdb, you need to have MySQL installed
$ sudo apt-get install python3-dev
$ sudo apt-get install libmysqlclient-dev
$ sudo apt-get install zlib1g-dev
$ sudo pip3 install mysqlclient
THEN CLOSE TERMINAL AND OPEN A NEW ONE to avoid  "ModuleNotFoundError: No module named 'MySQLdb' error
Install SQLAlchemy
sudo pip3 install SQLAlchemyNow in your Python Script:
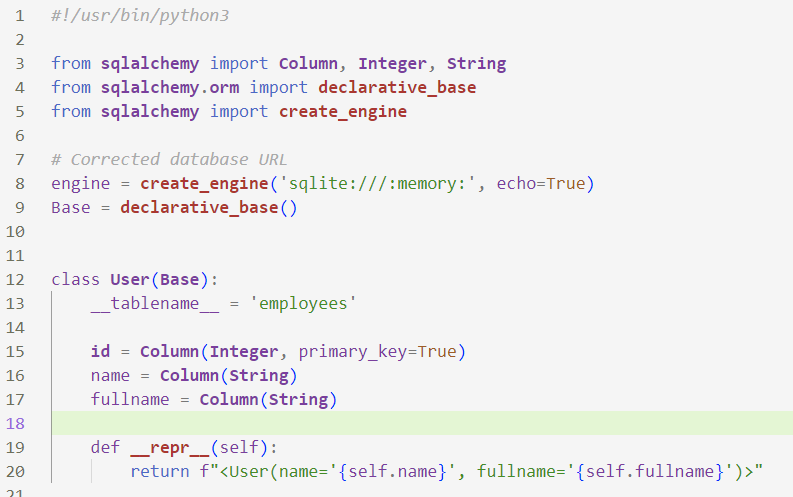
Import SQLAlchemy and Declare a Base:
First, you need to import SQLAlchemy and create a base class using declarative_base(). This base class will be used as a foundation for defining your mapped classes.
Define a Class for Your Table:
Create a Python class that corresponds to the table you want to map. This class should inherit from the
Baseclass you defined earlier. In this example, we'll create a class for a table named "users."
Metadata:
In SQLAlchemy, metadata is an object that represents the structure and schema of a database. It's a fundamental concept used to define database tables, columns, indexes, and other database objects. Metadata is part of SQLAlchemy's Object Relational Mapper (ORM) and is typically used when defining database models and tables.
Here are some key points about metadata in SQLAlchemy:
Database Schema Representation: Metadata serves as a container for various database-related constructs. It holds information about tables, columns, indexes, constraints, and other schema elements.
Table Definitions: You define database tables within the metadata object by creating instances of the
Tableclass and associating them with the metadata object. EachTableinstance represents a database table.Column Definitions: You define columns within a table using the
Columnclass and associate them with the table. Columns specify data types, constraints, and other attributes of the fields in the table.Table Creation: Once you've defined tables and columns in metadata, you can use SQLAlchemy to generate the SQL statements needed to create those tables in the actual database.
from sqlalchemy import create_engine, MetaData, Table, Column, Integer, String# Create a database engine (connect to your database)
engine = create_engine('sqlite:///mydatabase.db')# Create a metadata object
metadata = MetaData()# Define a table within the metadata
users = Table('users', metadata,Column('id', Integer, primary_key=True),Column('username', String(50), unique=True),Column('email', String(100)))# Create the table in the database
metadata.create_all(engine)
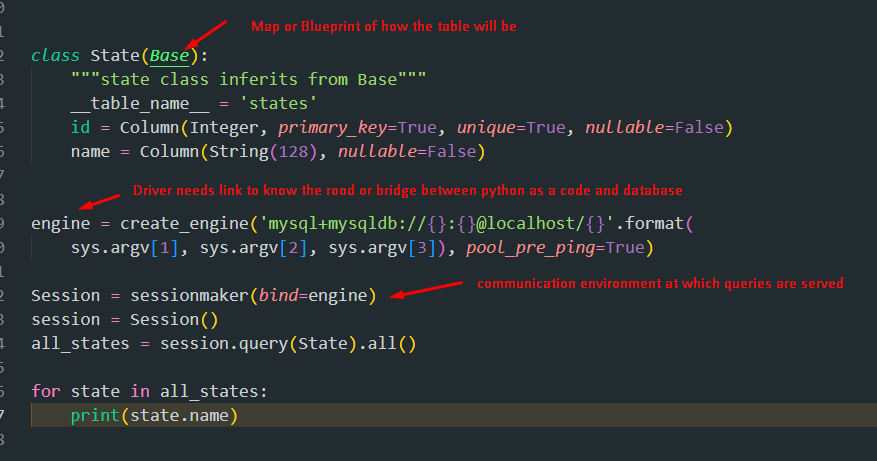
Let's simplify the concepts of Engine, Base, and Metadata in SQLAlchemy:
1. **Engine:**
- **Role:** Think of the engine as a bridge or a connection to your database.
- **Function:** It handles the actual communication with the database, like opening and closing connections, sending SQL queries, and managing connections efficiently.
- **Analogy:** The engine is like the driver of a car. It's responsible for making the car (your application) move and navigate the road (the database).
2. **Base:**
- **Role:** The Base is like a blueprint for your database tables. It defines what your tables will look like and how they relate to your Python objects.
- **Function:** It provides a way to define your data models (tables and their columns) in a Pythonic manner, making it easier to work with databases.
- **Analogy:** The Base is like a template for a house. It defines how the house will be structured (number of rooms, doors, windows) before you actually build it (create tables).
3. **Metadata:**
- **Role:** Metadata is like additional information about your tables. It stores details about table names, column names, data types, and constraints.
- **Function:** It helps SQLAlchemy understand the structure of your database tables, which is crucial for creating queries and performing operations on your data.
- **Analogy:** Metadata is like a map that shows you where everything is in a city. It doesn't represent the physical buildings (tables) but helps you find and understand them.
In summary:
- The **Engine** connects your application to the database and manages communication.
- The **Base** is a blueprint that defines your database tables and their relationships.
- The **Metadata** is like additional information that helps SQLAlchemy understand the structure of your tables.
Together, Engine, Base, and Metadata are essential tools for working with databases in SQLAlchemy, making it easier to interact with and manipulate your data from your Python code.
Example :

State in your database, and you have already defined a SQLAlchemy model for it, you can select all states using the following code:SQL injection :
SQL injection is a malicious technique where an attacker inserts malicious SQL statements into input fields, often in web applications, with the intention of manipulating a database. This can lead to unauthorized access, data breaches, and potentially the destruction of data. Parameterized queries are a method to prevent SQL injection by separating SQL code from user input.
Here's how parameterized queries work and why they prevent SQL injection:
Separation of SQL Code and User Input:
In a typical SQL query, user input is directly concatenated into the SQL statement. For example:
Parameterized Queries:
Parameterized queries, also known as prepared statements, separate user input from SQL code by using placeholders for user input.
The query is defined with placeholders, and the user input is passed separately. For example:
When a parameterized query is used, the database system knows that the input is data, not code.
The database system automatically escapes and sanitizes the user input, making it impossible for malicious input to modify the SQL query's structure.
Any attempt to inject SQL code via user input is thwarted because the input is treated as data, not executable code.
Note:
Using
if __name__ == '__main__':allows you to include code that should only run when the script is executed directly and not when it's imported as a module.Access command-line arguments passed to a Python script :
sys.argvlist contains the script name as its first element (sys.argv[0]) and any additional command-line arguments provided when running the script.For example, if you run a script like this:
python my_script.py arg1 arg2sys.argv[0]will be"my_script.py"(the script name).sys.argv[1]will be"arg1"(the first argument).sys.argv[2]will be"arg2"(the second argument).
Create a Python Virtual Environment, allowing you to install specific dependencies
$ sudo apt-get install python3-dev
$ sudo apt-get install libmysqlclient-dev
$ sudo apt-get install zlib1g-dev
$ sudo pip3 install mysqlclient
Resources


