
Python Playwright Tutorial: Browser Automation
A step-by-step tutorial on web scraping, testing, and browser automation with robust selectors, file downloads, and real-world examples.

Learn modern, reliable browser automation the right way. This practical tutorial walks you from first run to robust interactions, screenshots, downloads, smart selectors, scrolling strategies, and precision mouse control — all in clean, copy‑pasteable Python.
Who this is for
Job interview prep (headless browsers, automation)
Scraping dynamic sites that need a real browser
Automating repetitive tasks (logins, forms, downloads)
Prereqs: Python 3.9+ and
pip. Works on Windows, macOS, and Linux.
Part 1 — Introduction & Environment Setup
What is Playwright?
Playwright is an open‑source automation framework from Microsoft for reliable end‑to‑end testing and browser automation. It:
Supports all major engines: Chromium (Chrome/Edge), Firefox, and WebKit (Safari)
Auto‑waits for elements to be ready (reduces flaky scripts)
Ships with rich, high‑level APIs for realistic user flows
Common use cases
Scrape SPA/JS‑heavy sites
Automate data entry and report generation
Capture screenshots and PDFs
Handle file downloads/uploads
Simulate real user behavior (mouse, keyboard, hover)
Setup (once per project)
1) Create a project folder
mkdir tutorial-playwright && cd tutorial-playwright
2) Create & activate a virtualenv
# macOS/Linux
python3 -m venv .venv
source .venv/bin/activate
# Windows (PowerShell)
python -m venv .venv .\.venv\Scripts\Activate.ps1
3) Install libraries
pip install playwright beautifulsoup4
4) Install browser binaries
playwright install
5) Verify
playwright --version
Tip: If playwright isn’t on your PATH, try :
python -m playwright installand
python -m playwright --version.
Part 2 — Core Web Interactions & Workflow
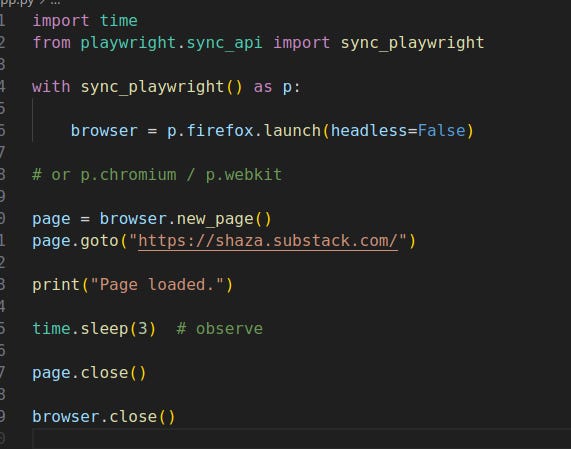
Your first script (minimal)
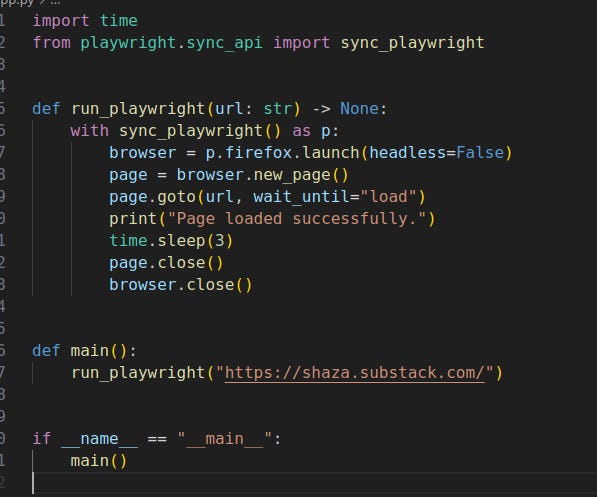
Refactor for reuse
Debug tip: Use
slow_mofor human‑watchable runs:p.chromium.launch(headless=False, slow_mo=200).
Selecting Elements — Robustly
Prefer accessible queries
If your element has a clear role/name, use role‑based APIs (cleaner and resilient):
page.get_by_role("button", name="Subscribe").click()
Fall back to CSS selector when needed
page.query_selector("button.subscribe-btn").click() # or a full path when you must be ultra‑specific # page.query_selector("#main > div.pencraft ... > button").click()
Rule of thumb
Use
get_by_role/get_by_textfor accessibility & maintainability.Use raw CSS only for complex/non‑accessible elements.
Locator — Your Best Friend
A Locator is Playwright’s smart handle for elements. It auto‑waits, reattaches after re‑renders, and can represent multiple matches.
Why it’s better than query_selector:
Auto‑waits for visibility & stability
Survives SPA re‑renders
Works with multiple elements (
.first,.last,.nth(i)) and strictnessChainable filtering
# ✅ Resilient
btn = page.locator("button.subscribe-btn") btn.click()
# Disambiguate
page.locator("button.subscribe-btn").nth(1).click()
# Scoped/chained
form = page.locator("form:has(input[placeholder='Type your email...'])") form.locator("button.subscribe-btn").click()
Quick compare
Feature query_selector locator Returns First match/None
Scrolling Strategies (that actually work)
1) Scroll into view (usually automatic)
page.locator("text=Subscribe").scroll_into_view_if_needed()
Playwright scrolls before click/fill automatically. Call this when you just need to ensure visibility.
2) Window scroll with JS (great for infinite feeds)
page.evaluate("window.scrollBy(0, 800)") page.evaluate("window.scrollTo(0, document.body.scrollHeight)")
3) Loop until something appears
while not page.locator("text=Target Post").is_visible(): page.evaluate("window.scrollBy(0, 1200)") page.wait_for_timeout(800)
4) Scroll inside a container (modals, chat panes)
panel = page.locator("div.scroll-container") panel.evaluate("el => el.scrollTop = el.scrollHeight")
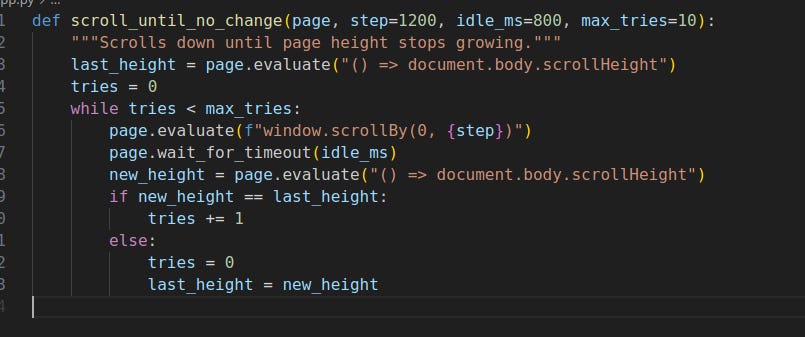
Bonus: generic infinite‑scroll helper
Part 3 — Advanced Interactions
XPath (available, but use sparingly)
xpath_input = "//input[@placeholder='search craigslist']" page.wait_for_selector(xpath_input, timeout=5000) page.locator(xpath_input).fill("apartment") page.locator(xpath_input).press("Enter")
Prefer
locator/role/text/CSS. Use XPath when it’s truly the cleanest selector.
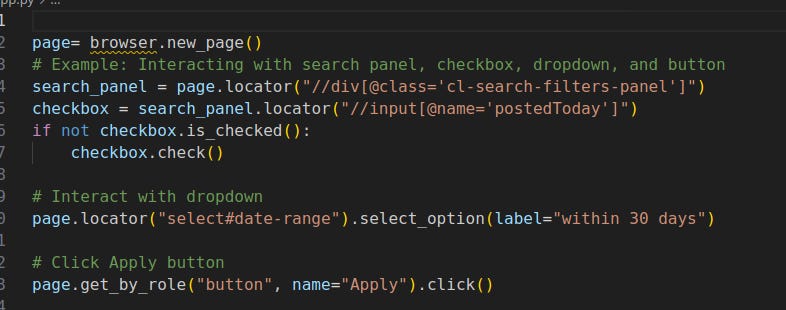
Working with checkboxes, dropdowns, and buttons
Scrolling a specific panel (element‑scoped JS)
search_panel.evaluate("el => el.scrollTop = el.scrollHeight")
Browser Context — Lightweight, Isolated Sessions
Browser instance = a whole engine process (
p.chromium.launch()). Heavy.Context = isolated profile inside that browser (
browser.new_context()). Light, separate cookies/localStorage.
with sync_playwright() as p:
browser = p.chromium.launch()
ctx1 = browser.new_context()
ctx2 = browser.new_context()
page1 = ctx1.new_page()
page2 = ctx2.new_page()
Use contexts to log into multiple accounts in parallel without opening multiple browser processes.
Part 4 — Media Handling: Screenshots & Downloads (14:16 – 16:34)
Full‑page screenshots
page.screenshot(
path="screenshot.jpeg",
full_page=True,
type="jpeg",
quality=95, )
Reliable file downloads
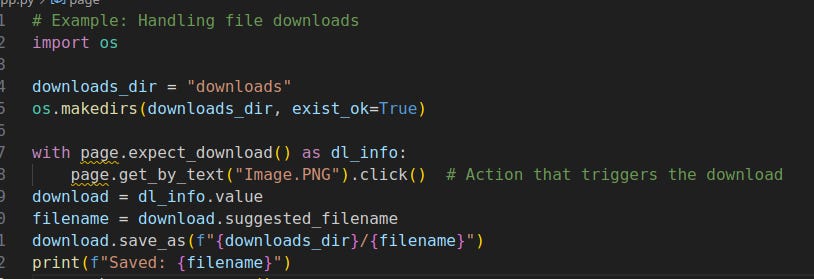
Make sure the click that triggers the download happens inside the
expect_downloadcontext.
Part 5 — Mouse API: High‑level vs Low‑level
High‑level (recommended most of the time)
page.click("button#start") # single page.dblclick("button#start") # double page.click("button#start", button="right") # right click page.hover("button#start")
Low‑level (pixel‑precise)
Use when interacting with canvas/games/drag‑drop where selectors aren’t enough.
# Suppose you already resolved a locator
button = page.locator("button#start")
box = button.bounding_box()
x, y = box["x"], box["y"]
w, h = box["width"], box["height"]
# Repeated double‑click in the center for 5s
import time
start = time.time() while time.time() - start < 5: page.mouse.dblclick(x + w/2, y + h/2) # Click‑and‑hold for 4s page.mouse.down() time.sleep(4) page.mouse.up()
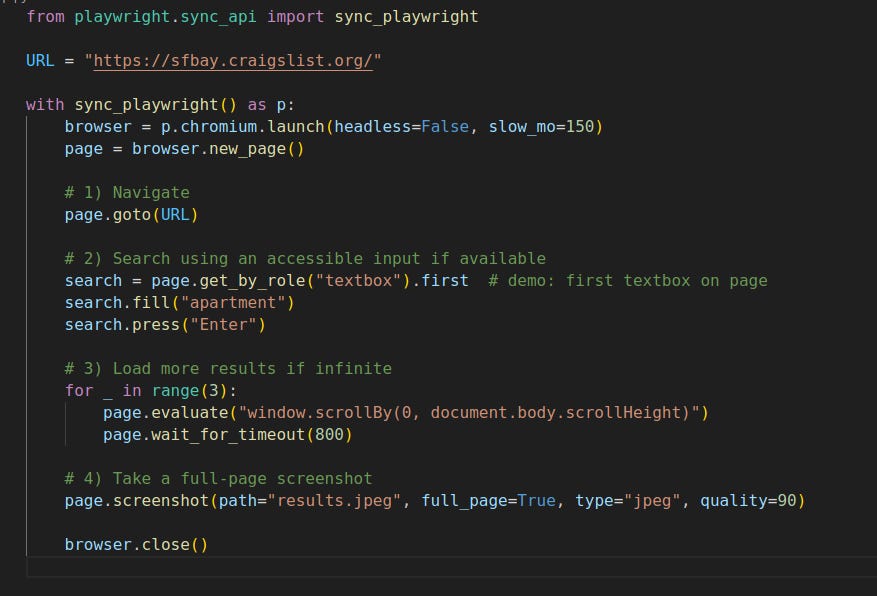
Putting It Together — Mini Flow
A tiny flow that shows navigation, robust selection, scrolling, and a screenshot.
Troubleshooting & Pro Tips
Timeouts: Increase with
page.set_default_timeout(10000)or passtimeout=to a single call.Wait for network/app state:
page.wait_for_load_state("networkidle")after navigation.Selectors changing? Prefer
get_by_role, thenlocatorwith smart filters (:has(),:has-text()), then CSS; use XPath last.Record selectors/code:
playwright codegen --target python -o script.py https://example.comHeadless runs in CI:
p.chromium.launch(headless=True).Parallel work: Open contexts instead of multiple browsers.
Playwright MCP Server: Bridging AI and Web Automation
The Playwright Model Context Protocol (MCP) server is a powerful tool that acts as a bridge, enabling artificial intelligence and large language models (LLMs) to interact with and automate web browsers through the robust Playwright framework.
This innovation allows for the translation of natural language commands into browser actions, significantly expanding the capabilities of AI agents in web-based environments.
At its core, the Playwright MCP server is a local Node.js server that listens for requests from MCP clients, such as AI agents, integrated development environments (IDEs) like Visual Studio Code, or other external tools.
This setup facilitates a modular and extensible approach to browser automation, moving beyond traditional, rigid scripting.
Architectural Overview: A Client-Server Model
The functionality of the Playwright MCP server is rooted in a client-server architecture. Here's a breakdown of the key components:
MCP Clients: These are the initiators of requests. Examples include AI agents, LLMs like those powering GitHub Copilot or Claude, and IDEs.
They send high-level commands, often in natural language, to the MCP server.
MCP Server: This is the intermediary that receives commands from the clients. It then utilizes the Playwright API to translate these commands into concrete browser actions, such as navigating to a URL, clicking buttons, filling out forms, or extracting data.
This decoupled architecture promotes flexibility and scalability in automation workflows.
Use Case: Automated Bug Reproduction
1. The Goal: A developer needs to verify a bug report: "Changing an item's quantity in the shopping cart doesn't update the total price."
Step 1 : Setting up the Environment
First, the engineer ensures the Playwright MCP server is available to Claude in their terminal by running a one-time setup command in their project directory.
npx '@playwright/mcp@latest'claude mcp add playwrightThis command links Claude to the Playwright MCP server, giving it access to a suite of browser automation tools
Step 2: Interacting with Claude using Natural Language
Prompt (Natural Language):
The developer instructs Claude in plain English:"Open the site, add the 'Cool Gadget' to the cart, go to the cart page, change its quantity to 3, and show me a screenshot."
3. What Happens:
Claude understands the instructions.
It sends commands to the Playwright MCP server, which controls a live web browser.
The browser automatically navigates to the site, clicks the buttons, and changes the quantity in the input field.
The server takes a screenshot and sends it back to Claude, visually confirming the bug.
4. The Final Result:
The developer then asks, "Generate a Playwright test script for this." Claude instantly provides a complete, ready-to-use test script that automates the bug-checking process for the future.This entire workflow turns a manual task into an automated test in a matter of seconds, all through simple conversation.
If you found this helpful, consider bookmarking — this is a battle‑tested skeleton you can reuse across projects and interviews.