
Using OAuth2 with Nodemailer for Secure Email Sending
NodeJs-express - OAuth 2.0 - console.cloud.google - API

When it comes to sending emails from your application, security is paramount. One method to enhance email security is by leveraging OAuth2 authentication instead of relying solely on username and password credentials. In this guide, we'll walk through the steps to set up Nodemailer with OAuth2 for sending emails via Gmail, or any other service that supports OAuth2.
Step 1: Obtain OAuth2 Credentials from Google
Google Cloud Console: Go to the Google Cloud Console.
Create a Project: If you haven't already, create a new project.
Enable Gmail API: Navigate to the "Library" section, search for the Gmail API, and enable it for your project.
Create Credentials:
Go to the "Credentials" tab and click on "Create Credentials".
Choose "OAuth client ID".

You may need to configure the "Consent Screen" first if you haven't done so. Choose "External" and fill in the required details.
For application type, select "Web application".
Add a name for your OAuth 2.0 client and under "Authorized redirect URIs", add a URI if needed (this is more relevant for web applications that will authenticate users via OAuth).
Click "Create". You'll get your client ID and client secret.

Step 2: Obtain the Refresh Token
You need a refresh token to allow Nodemailer to securely access your Gmail account without needing to re-authenticate each time it sends an email. You can obtain this token by following these steps:
OAuth2 Playground: Go to the Google OAuth2 Playground.
Set Up OAuth2 Playground:
Click on the gear icon in the upper right corner and check the "Use your own OAuth credentials" checkbox.
Enter the OAuth Client ID and Client Secret you got from the Google Cloud Console.

Authorize APIs:
In the "Select the Scope" box, search for and select : https://mail.google.com/

Click "Authorize APIs" and complete the authentication flow.
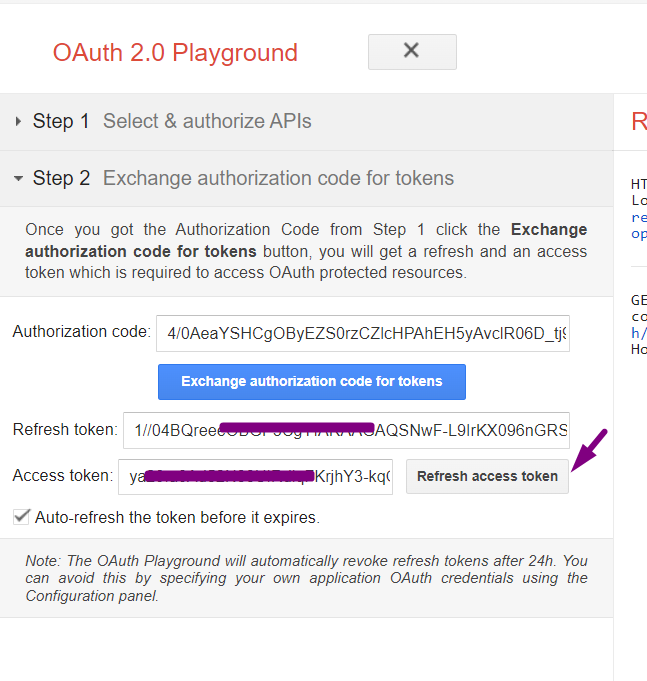
Exchange Authorization Code for Tokens:


Click on "Exchange authorization code for tokens" to get your refresh token and access token.
Alarm To Avoid Access Blocked Problem:
1- make your self a test user
2- redirect url is : https://developers.google.com/oauthplayground

Step 3: Configure Nodemailer with OAuth2
After obtaining your OAuth2 credentials and tokens, you can configure Nodemailer like this:
const nodemailer = require('nodemailer');

const transporter = nodemailer.createTransport({
    service: 'gmail',
    auth: {
        type: 'OAuth2',
        user: 'yourgmail@gmail.com',
        clientId: 'Your-Client-ID-Here',
        clientSecret: 'Your-Client-Secret-Here',
        refreshToken: 'Your-Refresh-Token-Here',
        // Optional, if you already have an access token:
        // accessToken: 'Your-Access-Token-Here',
    }
});
Replace yourgmail@gmail.com, Your-Client-ID-Here, Your-Client-Secret-Here, and Your-Refresh-Token-Here with your actual Gmail address and OAuth2 credentials.
Step 4: Send an Email
Now, you can send an email using the transporter:
let mailOptions = {
    from: 'yourgmail@gmail.com',
    to: 'recipient@example.com',
    subject: 'Hello from Nodemailer!',
    text: 'This email is sent using Nodemailer with OAuth2 authentication.'
};

transporter.sendMail(mailOptions, function(error, info) {
    if (error) {
        console.log(error);
    } else {
        console.log('Email sent: ' + info.response);
    }
});
Notes
The refresh token is long-lived, but you may need to handle scenarios where the token is revoked or expires.
If you're deploying this in a production environment, ensure you secure your OAuth2 credentials and tokens appropriately, for example, by using environment variables or encrypted configuration files.
Google's policies and the setup process may change, so it's a good idea to refer to the official Google documentation for the most up-to-date instructions.
This setup provides a more secure and robust way to send emails from your application, leveraging the security and scalability of OAuth2 and Gmail.
Example emailController.js:
const nodemailer = require('nodemailer');
const expressAsyncHandler = require('express-async-handler');
const sendMail = expressAsyncHandler(async (data, req, res) => {
const { to, subject, text } = req.body;
const transporter = nodemailer.createTransport({
service: 'gmail',
auth: {
type: 'OAuth2',
user: process.env.EMAIL,
clientId: process.env.CLIENT_ID,
clientSecret: process.env.CLIENT_SECRET,
refreshToken: process.env.REFRESH_TOKEN,
accessToken: process.env.ACCESS_TOKEN,
}
});
let mailOptions = {
from: process.env.EMAIL,
to: 'recipient@example.com',
subject: 'Hello from Node-ecommerce APP!',
text: 'This email is sent using Nodemailer with OAuth2 authentication.'
};
transporter.sendMail(mailOptions, function(error, info) {
if (error) {
console.log(error);
} else {
console.log('Email sent: ' + info.response);
}
});
})
module.exports = sendMail;
Testing: Before deploying, thoroughly test this functionality in a development environment, especially to ensure that your OAuth2 setup works correctly and that your environment variables are correctly set.
Usage: To use this controller in your routes, you'll need to import it and use it as middleware for the appropriate route(s) in your Express application.
Note if got an error : Error: Invalid login: 535-5.7.8 Username and Password not accepted. For more information, go to
it means access token expired : click refresh access token then exchange
Resources:
https://stackoverflow.com/questions/75454425/access-blocked-project-has-not-completed-the-google-verification-process