Airbnb Clone Console (PREP)!
Serialization Deserialization - *args and **kwargs - File Storage - cmd
Topice:
JSON versus Dict
Serialization Deserialization
*args and **kwargs
File Storage
CONSOL
JSON versus Dict :
JSON and dict are both data structures that store data in key-value pairs. However, there are some key differences between the two.
JSON is a text format, while dict is an in-memory object. This means that JSON can be easily serialized and deserialized, while dicts cannot. This makes JSON a good choice for data that needs to be exchanged between different systems or stored in a file.
The keys in JSON must be strings, while the keys in dict can be any hashable object. This means that JSON is not as flexible as dict when it comes to storing data. For example, you cannot store a list as a key in JSON.
JSON objects are ordered, while dicts are not. This means that the order of the keys in a JSON object is preserved when the object is serialized or deserialized. However, the order of the keys in a dict is not preserved.
In general, JSON is a good choice for data that needs to be exchanged between different systems or stored in a file. Dict is a good choice for data that needs to be stored in memory and accessed quickly.
Here is a table summarizing the key differences between JSON and dict:
FILE STORAGE:
Serialize:
Serialization: The instance is serialized by converting it into a dictionary representation.
The dictionary representation is then converted into a JSON string using a serialization library or method.
The JSON string can be stored in a file or transferred over a network if desired.
Deserialization: The process is reversed to retrieve the instance from the JSON string.
The JSON string is converted back into a dictionary representation.
The dictionary representation is then used to recreate the original instance in memory.
Example:
Step 1: Define a simple class representing an instance that we want to serialize and deserialize.

__str__ method should return a string that provides a human-readable representation of the object. This string can be used to display the object in a user interface, or to log the object to a file.Step 2: Create an instance of the class and convert it to a dictionary using the __dict__ attribute.

__dict__ attribute is used to store an object's (writable) attributes. In other words, it is a mapping of attribute names to their corresponding values.Step 3: Serialize the dictionary to a JSON string and write it to a file :
Writing json to a file :
Deserialize ?
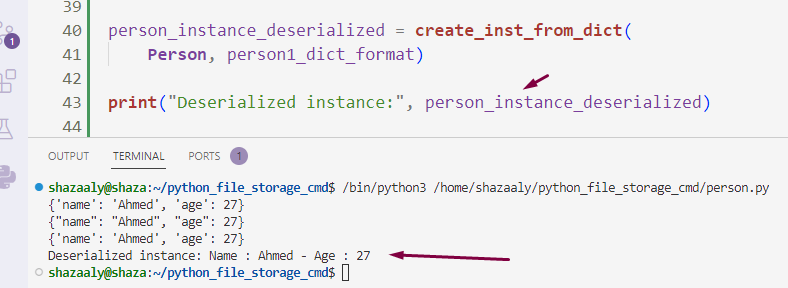
To deserialize we need to read json string from the file then converting it back to dict format then to our instance :
Step 4: Read the JSON string from the file and deserialize it to a dictionary:
Step 5: Define a function to create an instance dynamically from a dictionary.

create_instance_from_dict function provides a generic way to create instances of any class from a dictionary. It works by creating a new instance using __new__() and then setting its attributes dynamically based on the key-value pairs in the input dictionary using setattr()__new__()method of the class to create a new instance of the specified class. This method is responsible for creating a new instance object but does not initialize its attributes.setattr(instance, key, value): For each item in thedata_dict, we use thesetattr()function to set the attribute of the instance with the givenkeyto the specifiedvalue. This line effectively assigns the attribute values to the instance dynamically.
*args and **kwargs
Special keywords that can be used to pass a variable number of arguments to a function. for detailed explanation please visit :
cmd
cmd is a module in Python. The cmd module provides functionality to create line-oriented command interpreters, similar to a command-line interface. It is used to build interactive command-line applications where users can input commands, and the application responds accordingly.
You can use the cmd module to implement your own custom command-line interpreter, defining commands and their corresponding actions as methods within a class that inherits from the cmd.Cmd class.
The cmd.Cmd class provides the underlying infrastructure for handling user input, parsing commands, and executing the appropriate methods based on the input.
Basic Command-Line Interpreter Setup

MyCmd class is a simple command-line interpreter that responds to the "hello" command by printing "Hello, world!".Customizing the Prompt:
Example: In the previous example, the prompt was set to ">>". Developers can customize it according to their preference. example : (hbnb)
Defining Commands
Explanation: The
do_prefix is used to define commands in the subclass. When a user enters a command, theCmdmodule will automatically call the corresponding method.
Example:

if __name__ == "__main__": clause at the end of the code defines the main function. The main function creates an instance of the MyCmd class and calls the cmdloop() method. The cmdloop() method enters a loop that reads commands from the user and executes them.preloop
Explanation:
In the Cmd module, there are two methods, preloop and postcmd, that can be overridden to customize the behavior of your command-line interpreter.
preloop:Explanation: The
preloopmethod is called once before the command loop starts. It can be used to set up any initial conditions or perform actions before the user starts interacting with the command-line interpreter.
postcmd:
Explanation: The
postcmdmethod is called after each command is executed. It can be used to perform actions or display messages after the execution of a command.def postcmd(self, stop: bool, line: str) -> bool:if not stop:if line.strip() == "quit":print("$")return Truereturn stop
onecmd:
Execute a command within the context of the cmd.Cmd class without the need for interactive input from the user. Let’s explore it…
Non-interactive mode
refers to a mode of operation where a program or system does not require real-time user input and can be automated or run without direct user interaction.
In the context of a Python cmd.Cmd script, which provides an interactive command-line interface, running the script in interactive mode means that it expects the user to enter commands one at a time, and it responds to each command interactively.
On the other hand, running the script in non-interactive mode means that the script is not waiting for real-time user input, but instead, it receives input from an external source or a predefined input stream, such as a file or a script.
Here are a few examples to illustrate the difference between interactive and non-interactive modes:
Interactive Mode: When you run the
console.pyscript without any input redirection, it enters interactive mode:
In interactive mode, the script displays a prompt "($)" and waits for the user to enter commands one by one.
Non-Interactive Mode: When you run the
console.pyscript with input redirection, it enters non-interactive mode:
$ echo "help" | python3 console.pyIn non-interactive mode, the script processes the input provided through input redirection without displaying a prompt or waiting for user input in real-time. The output is printed directly based on the provided input.
So, when you run the entire command echo "help" | python3 console.py, here's what happens:
The
echocommand prints the text "help" to the standard output (terminal).The pipe operator (
|) takes the output ofecho "help"(which is "help") and feeds it as input to thepython3 console.pycommand.The
console.pyscript reads the input "help" from the standard input (stdin) using theinput()function. However, in this case, we need to usesys.stdin, it will read the input correctly.The
console.pyscript processes the input "help" as a command, and thecmd.Cmdclass provides the output for the "help" command.The output of the "help" command, which is the list of documented and undocumented commands, is printed to the standard output.
Non-interactive mode is useful for automation, scripting, and batch processing tasks, where user interaction is not required, and you want to feed predefined commands to the script.

() method in Python is used to check whether the specified file descriptor is open and connected to a tty(-like) device or not. A tty(-like) device is any device that acts like a i.e. a terminal.The help command is built into Cmd. With no arguments, it shows the list of commands available. If you include a command you want help on, the output is more verbose and restricted to details of that command, when available.
Handle multiple command-line arguments :
sys.argv list, which contains all the command-line arguments. You can loop through sys.argv[1:] (excluding the first element, which is the script's name) and execute the commands
Each command is executed one by one, and the script processes all the commands provided as command-line arguments.
uuid
In Python, you can generate UUIDs (Universally Unique Identifiers) using the uuid module. UUIDs are 128-bit unique identifiers that are often used to identify objects across different systems or platforms. The uuid module in Python provides various functions to create different types of UUIDs.
Generate a random UUID:
Here's how you can work with UUIDs in Python:
Note: UUID version 4 is a randomly generated UUID. It means that when you create a UUID using
uuid.uuid4(), the UUID is generated based on random numbers and is not derived from any specific input.
The UUID string representation is a human-readable format used to represent UUIDs (Universally Unique Identifiers). UUIDs are 128-bit unique identifiers, typically displayed as a sequence of 32 hexadecimal digits, separated by hyphens into five groups in the form of "8-4-4-4-12".
Resources
How To Use *args and **kwargs in Python 3
cmd – Create line-oriented command processors
Please review :
Python - Almost a circle "OOP Highlights"
Main Topics Covered: *args and **kwargs Magic Variables. The __init__.py files. super( ).__init__ use case type() versus isinstance() to check data types. Private attributes - getters and setters Create a simple x-y plot. Static methods review. Name file dynamically with extension :
Next Part :
Airbnb Clone Console (1)
unittests setup and tearDown. __init__.py datetime module. __str__ isoformat() Example Overview of Initial Structure. Unittests in OOP Practice. *args and **kwargs inside the __init__


![We'll loop through sys.argv[1:] and execute each command separately. We'll loop through sys.argv[1:] and execute each command separately.](https://substackcdn.com/image/fetch/$s_!avE5!,w_1456,c_limit,f_auto,q_auto:good,fl_progressive:steep/https%3A%2F%2Fsubstack-post-media.s3.amazonaws.com%2Fpublic%2Fimages%2Fcc01d9b9-6550-4269-8eb6-e9a6e283f888_438x223.png)


amazing post, help me a lot <3 thank you so much